Why do image resizing?
One of the many features of Next.js is built-in image resizing. If you use Next.js' built-in image component like below, Next.js will resize the image for you, so the user's browser will download the appropriately resized image, reducing the image file size and increasing website load speeds.
import Image from "next/image"

function Home() {
  return (
    <>
      <h1>My Homepage</h1>
      <Image
        src={"https://jamesku.cc/images/my-image.jpeg"}
        alt="Picture of the author"
        // width={500} automatically provided
        // height={500} automatically provided
        // blurDataURL="data:..." automatically provided
        // placeholder="blur" // Optional blur-up while loading
      />
      <p>Welcome to my homepage!</p>
    </>
  )
}
How it actually works
If you deploy your Next.js app without npm run export, your deployment probably uses a node.js to serve your next.js app, so everything next.js generates, for example, .js files and .css files, will be served by this node server. The way next.js' image resizing actually works, is that next.js will replace the image's url with some other url generated by next.js.
So what does this new url point to? As you may have guessed, it points to the resized version of the image!
But how and when are the resized images generated? They are actually generated by the node.js server when someone requests the image and are saved on the server. So the images are not generated at build time, but actually at run time!
Incrased server load
Because the resized images are generated by the node.js server at runtime, using Nest.js' built-in image-resizing actually increases load on the server and can cause some issues.
Not cloud-run-friendly
Not only does the built-in image resizing increases server load, it actually has some other issues as well.
So GCP's cloud run is a nice service. It allows you to deploy your app incredibly easily just by using a docker image. However, one of the things it lacks is disk storage; it uses RAM to simulate storage. See the problem now?
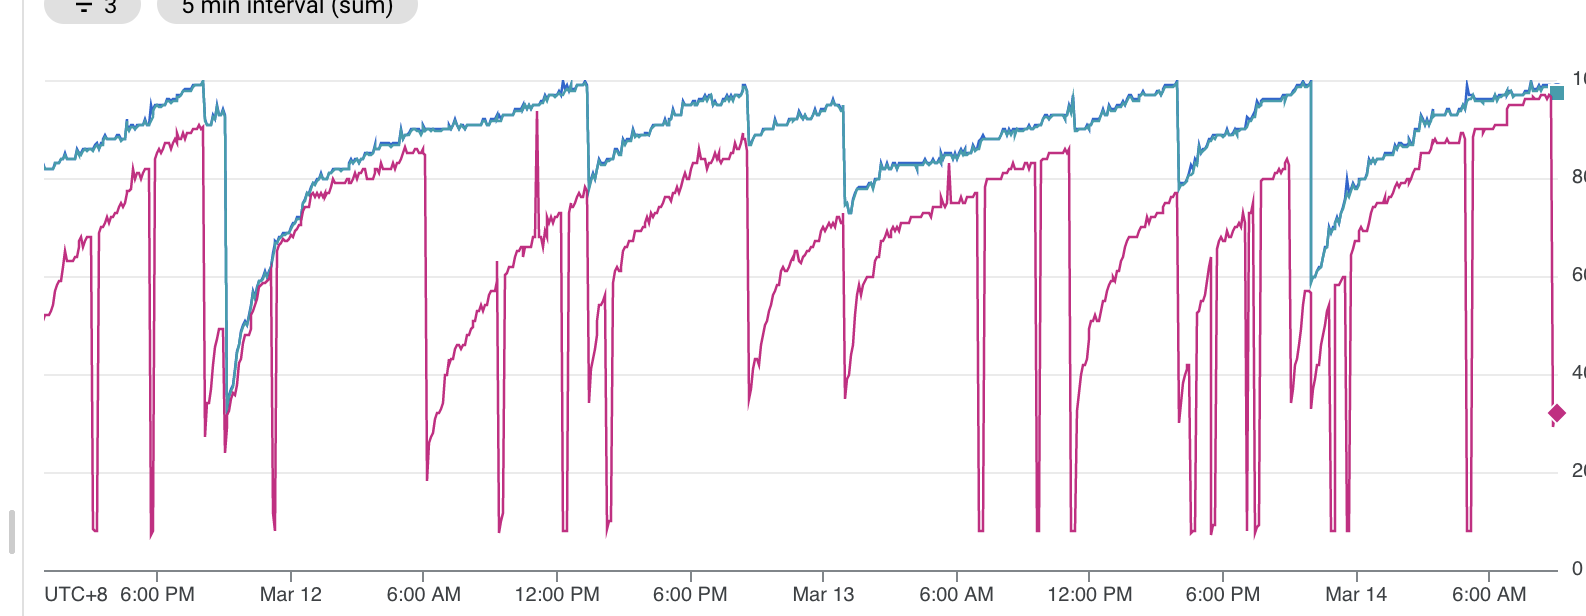
So if you use Next's built-in image resizing, the resized images will be stored in memory, so the ram usage will keep growing, until the container crashes. Below is the chart of the ram usage of our next.js app.

As the chart shows, the ram usage is always very high and only sharply drops when the container crashes due to reaching memory usage limit.
self-hosted image resizing service
One way to solve this issue, is of course, deploy your app on vercel and call it a day. But what if you don't want to host it on vercel? The fix that I thought of for this issue is to use a self-hosted image resizing service and offload the responsibility of image resizing to some other service. You can also enable a CDN on top of that. There are some cloud solutions for this, like cloudflare or imigx. But if you want to go the self hosting route, the best one I found was imgproxy.
Deploy your own imgproxy on cloud run
The way I deployed imgproxy was to deploy the official docker image on cloud run. To do this, you first need to pull the image:
docker pull darthsim/imgproxy:v3.3 --platform=linux/amd64
And then push it to your container registry:
docker tag darthsim/imgproxy gcr.io/your-regisry/imgproxy:v3.3
docker push gcr.io/your-regisry/imgproxy:v3.3
Now, just select the docker image you just pushed and deploy a cloud run service on GCP. Congratulations! You now have your own image-resizing service deployed. Of course, there are some configurations you can tweak like restricting the image source, but I won't go into the details here. To further improve website load speeds, you can also put a load balancer in front of imgproxy and enable CDN.
Use a custom image loader in you Next app
Now, to load your images from the newly created imgproxy service, you will need to use a custom loader when you use the Image component in Next.js.
See the docs here. Below is the code for the custom loader as well as our custom image component ImageWithFallback.
import Image, { ImageProps } from "next/image"
import React, { memo, useCallback, useState } from "react"

interface IProps extends ImageProps {
  fallbackSrc: string
  alt: string
}

const imgProxyLoader = ({
  src,
  width,
  quality,
}: {
  src: string
  width: number
  quality?: number
}) => {
  const options =
    `/size:${width}:::` +
    (quality ? `/quality:${quality}` : "") +
    `/plain/${src}`
  const result =
    process.env.NEXT_PUBLIC_IMAGE_RESIZING_SERVER_URL + "/insecure" + options

  return result
}
const ImageWithFallback = ({ src, alt, fallbackSrc, ...rest }: IProps) => {
  const [imgSrc, setImgSrc] = useState(src)

  // eslint-disable-next-line react-hooks/exhaustive-deps
  const handleFallbackSrc = useCallback(() => setImgSrc(fallbackSrc), [])

  return (
    <Image
      {...rest}
      loader={imgSrc === fallbackSrc ? undefined : imgProxyLoader}
      src={imgSrc}
      alt={alt}
      onError={handleFallbackSrc}
    />
  )
}
With the custom image component ready, now you can use this component to render images, and your images will now be resised by your imgproxy service on cloud run!